
Toyota Grand Highlander (AS10) 2024 Owners Manual / Before driving / Favorite settings / Driving position memory
Toyota Grand Highlander (AS10): Driving position memory
This feature automatically adjusts the driver's seat, outside rear view mirrors and head-up display (if equipped) to make entering and exiting the vehicle easier or to suit your preferences.
Up to 2 different driving positions can be recorded.
Each electronic key can be registered to recall your preferred driving position.
Recording a driving position into memory
1. Check that the shift position is in P.
2. Turn the engine switch to ON.
3. Adjust the driver's seat, outside rear view mirrors and head-up display (if equipped) to the desired positions.
4. While pressing the "SET" button, or within 3 seconds after the "SET" button is pressed, press button "1" or "2" until the buzzer sounds.
If the selected button has already been preset, the previously recorded position will be overwritten.
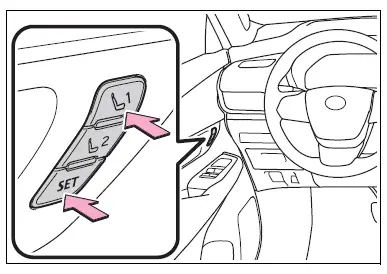
■Seat positions that can be memorized
The adjusted positions other than the position adjusted by lumbar support switch can be recorded.
■In order to correctly use the driving position memory function
If a seat position is already in the furthest possible position and the seat is operated in the same direction, the recorded position may be slightly different when it is recalled.
WARNING
■Seat adjustment caution
Take care during seat adjustment so that the seat does not strike the rear passenger or squeeze your body against the steering wheel.


Similar pages:
Odometer and trip meter
display
■ Display items
Odometer
Displays the total distance the vehicle
has been driven.
Trip meter A/trip meter B
Displays the distance the vehicle
has been driven since the meter
was last reset. Trip meters A and B
can be used to record and display
different distances independently.
Distance un ...
Checking and adding the
brake fluid
■ Checking fluid level
The brake fluid level should be
between the "MAX" and "MIN"
lines on the tank.
■ Adding fluid
Make sure to check the fluid
type and prepare the necessary
item.
Fluid type
FMVSS No.116 DOT 3 or SAE
J1703 brake fluid
FMVSS No.116 DOT 4 or SAE
J1704 brake fluid
Item
Cl ...